Page History
| Table of Contents |
|---|
...
Сделки пользователя по базовым активам отображаются в таблице Менеджер сделок
...
- по инструменту;
- по счету;
- по стратегии внутри счета;
- по времени исполнения.
Рисунок 1 – настройки фильтрации
| Column | ||||||||
|---|---|---|---|---|---|---|---|---|
|
Для отображения сделок укажите условия фильтра и нажмите кнопку Filter.
Фильтр по инструментам задается следующим образом. В списке слева представлены доступные инструменты, справа - инструменты, которые следует отображать. Используя кнопки с изображением стрелок можно добавлять и удалять отображаемые инструменты. Переносить из списка в список можно не только определенные инструменты, но и серию или базовый актив целиком. Кнопка с крестиком очищает фильтр по инструментам.
| Note |
|---|
Для того чтобы отображать сделки по базовому активу нужно в списке отображаемых инструментов выставить галочку напротив этого базового актива. |
Фильтр по счету задается путем выбора одного из пунктов в ниспадающем списке. Если выбран первый пункт (пустая строка), то фильтрация по счету не осуществляется. Если установлена фильтрация по счету, то в ниспадающем списке стратегий появляются все стратегии из выбранного счета. Если в этом списке выбран пункт "*", то фильтрация по стратегии не осуществляется. В противном случае отображаются только сделки, попавшие в выбранную стратегию.
Колонки таблицы сделок
Таблица сделок содержит следующую информацию:
- базовый актив инструмента;
- инструмент;
- тип инструмента;
- страйк;
- время сделки;
- цена сделки;
- объём сделки (покупка - с плюсом, продажа - с минусом).
Настройки
Таблица сделок имеет возможность настраивать набор отображаемых колонок и их порядок. Набор определяется в диалоге, который вызывается по нажатию на кнопку настройки в правой части панели инструментов (рис. 2). Порядок колонок задаётся простым перетаскиванием их заголовков при помощи мышки. Сортировка по любой из колонок задается нажатием на заголовке колонки левой кнопкой мыши.
Рисунок 2 – настройки отображения таблицы
Fill manager is a special kind of tool which allows you to view and filter fills received by Option Workshop (Fig. 1). There are numerous filtering options:
- by instrument;
- by account;
- by strategy name;
- by fill time.

Fig. 1 – Fill manager form
Filtering fills
In order to filter fills by instrument, select desired futures or options in the left-hand instrument tree and click to move selected items into the right-hand tree. Items in the right tree are filter conditions - only fills on instruments from the right tree will be shown. Note that items in the right tree that represent futures have checkboxes - if the checkbox is set then the future is included in the filter, otherwise it will be excluded. You may remove items from the right tree by selecting them and clicking
to remove them or click
to remove all items from the right tree.
You may select date and time range using two date-time controls: one specifies beginning of the range and the other specifies the end of the range. Initial date and time range only include the current day.
| Note |
|---|
Note that only a 24-hour time format is accepted. |
You may specify filter by account by selecting an account name in the drop-down list. If you select <any> item than no account filter will be set.
Similar to account filter, there is strategy name filter. You may specify it by selecting a strategy name in drop-down list or entering a strategy name into the field. If you select <any> item then no strategy name filter will be set.
To apply the filter you have selected, click the Filter button. After a couple of moments, all fills complying with the filter will be shown in the table (Fig. 2).
Fig. 2 – filtering fills
| Note |
|---|
Note that if there are no fills complying with the filter then the table will be empty. No specific message will be displayed. |
Editing fills
There are 3 options to edit stored fills' parameters:
- editing the fill price and size;
- moving the fill into another strategy;
- delete the fill entirely.
Editing price and size
Select a fill to edit by clicking on it, then open the context menu by right-clicking on the fill and select the Edit fill command. The following dialog will then pop-up (Fig. 3).

Fig. 3 – editing fill
Edit the fill's price and quantity and confirm your input by clicking the OK button or pressing Enter key. Edited parameters will be applied to the selected fill
| Note |
|---|
Fill's price or quantity cannot be equal to zero. |
Moving fills
Select the fills to move by clicking on them in the table. You can select multiple fills by holding down the Ctrl key or select a range of rows by holding down the Shift key. Right-click on the selected row to open the context menu and select the Move to strategy command. After that, the following dialog will pop-up (Fig. 4).

Fig. 4 – moving fill
Select a target strategy name from the drop-down list or enter it in the text field, then confirm your input by clicking the OK button or pressing the Enter key. The fills you have selected will then be moved into then strategy with the specified name. Note that you may enter any valid strategy name, even if there is no strategy with that name. Valid strategy names include any non-empty string excluding actualand total. Note that default is a valid strategy name here.
| Note |
|---|
You cannot move fills if they are not on the same commodity or if they belong to different accounts. |
Deleting fills
Click in the fill's row to delete it from the database. You can only delete virtual fills; real fills cannot be deleted. When you delete a virtual fill, its effect on the position is reverted (you can read more about virtual fills and their effect on positions here).
Fills table
The fills table is displayed on the right half of the fill manager's window and contains the following columns:
- Exchange ID – fill's identification code assigned by the data source;
- Account – name of the account which the fill belongs to;
- Strategy – name of the strategy which the fill belongs to;
- Base asset – ticker symbol of the fill's instrument's base asset or commodity;
- Instrument – ticker symbol of the fill's instrument;
- Type – fill's instrument type: Call means call option, Put means put option, Fut means future contract;
- Strike – fill's instrument strike price. Displayed only for options;
- Time – fill's date and time;
- Price – fill's price;
- Quantity – fill's size. Sizes greater than zero indicate buy fills, sizes less than zero indicate sell fills;
- Virtual – contains Yes if the fill is virtual, contains No otherwise;
- Del – if the fill is virtual, then this column will contain a Delete button; it will be empty otherwise.
You may configure which columns will be visible by clicking . The following dialog will open (Fig. 5).
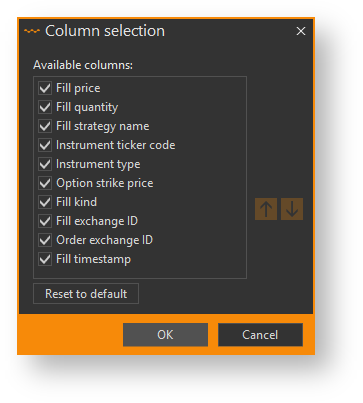
Fig. 5 – columns selection
Use the checkboxes to specify which columns you wish to see on the option desk, then click the OK button to apply changes.
Columns can be also reordered. Press the left mouse button on the column and drag it while holding the left mouse button down. Release the mouse button to drop the column in its new place.
Column settings will be saved so they will be applied automatically when the upcoming Option Workshop launches. If you want to return to default settings, click .. Таблица позволяет:
- просматривать историю сделок;
- создавать сделки вручную для моделирования стратегии;
- перемещать сделки между стратегиями.
Вызов Менеджера заявок осуществляется следующими способами:
- путем нажатия кнопки
на боковой панели;
- путем выбора команды Display fills в контекстном меню инструмента/стратегии.
Менеджер сделок состоит из трех блоков:
- Accounts – содержит список счета и базовых активов (раздел Счета);
- Strategies – содержит список стратегий (раздел Стратегии);
- Fill – содержит список сделок.
Для просмотра сделок необходимо выбрать Счет→Базовый актив→Стратегию (рис. 1).

Рисунок 1 – Менеджер сделок
Таблица сделок содержит столбцы:
- Time – время заключения сделки;
- Price – цена сделки;
- Quantity – размер;
- Strategy – стратегия;
- Instrument – код инструмента;
- Type – тип инструмента;
- Strike – страйк опциона;
- Kinde – тип сделки:
- external – внешние сделки;
- manual – пользовательские, созданные вручную в Менеджере заявок
- adjustment – корректирующие, создаются автоматически при редактировании размера позиции;
- Exchange ID – код сделки, сгенерированный торговой биржей;
- Order ID – код заявки выставленной из OW, по которой пришла сделка.
Фильтрация сделок
Сделки в таблице можно отфильтровать по дате поступления и по типу.
Фильтр по типу сделки задается путем выбора одного из пунктов в выпадающем списке (рис. 3). При установке переключателя фильтрация производится автоматически.
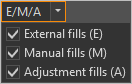
Рисунок 3 – фильтрация по типу сделки
Overview
Content Tools