Page History
| Table of Contents |
|---|
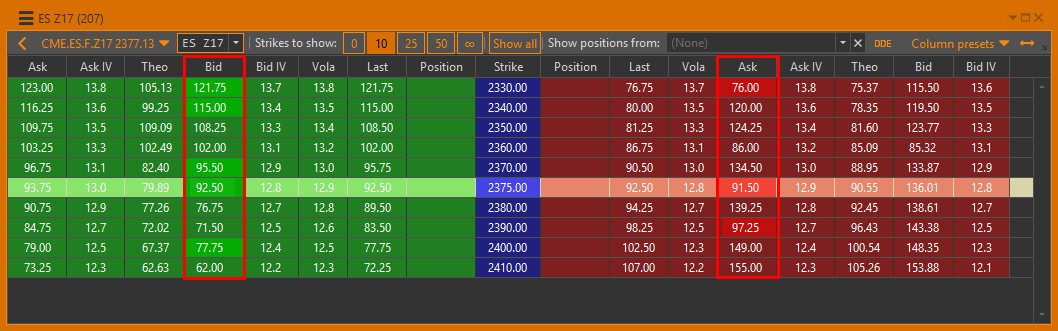
Option desk is a common way of representing an option series. It allows you to see all basic scalar parameters for all contracts simultaneously (Fig. 1).
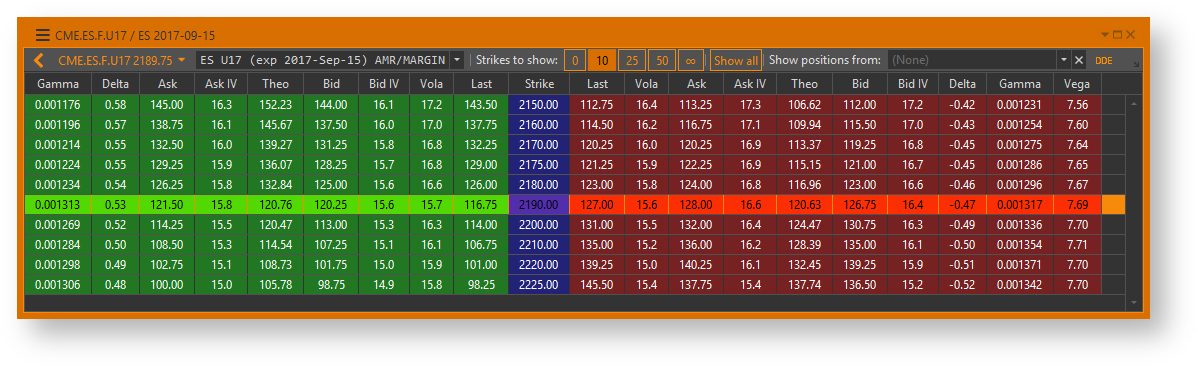
Fig. 1 – option desk
Opening option desk
Option Workshop offers two ways to open option desk:
- Double-click on the desired option series in the Series window;
- Open context menu for the desired series by right-clicking on series in the Series window, then select the Open Grid command from menu (Fig. 2).
Either way, an option desk window will be opened.
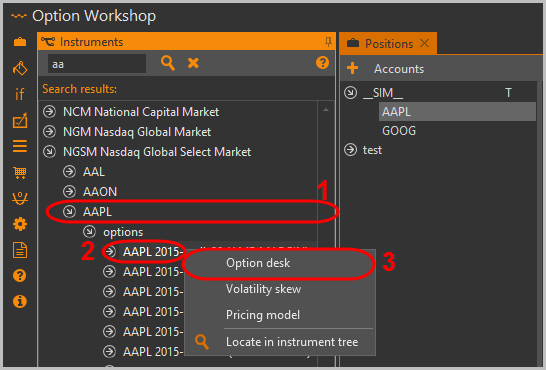
Fig. 2 – opening option desk
Working with option desk
Option desk is basically a table with the following columns:
- strike price;
- market volatility;
- Greeks;
- theor. prices;
- best bid/ask prices.
All columns (with the sole exception of Strike price column) exist in two copies – one for call options and one for put options. Call option columns are filled with green color while put option columns are red. You may configure which columns will be visible by clicking  . The following dialog will open (Fig. 3).
Fig. 3 – columns selection
Use the checkboxes to specify which columns you wish to see on the option desk, then click the OK button to apply changes.
Columns can be also reordered. Press the left mouse button on the column and drag it while holding the left mouse button down. Releasethe mouse button to drop the column in its new place.
Column settings will be saved so they apply automatically in upcoming Option Workshop launches. If you want to return to default settings, click  .
.
Fast orders
If you want to place an order on an option, you may do it directly from option desk (Fig. 4). Double-click on the desired row to open a pre-filled Place order dialog. If you click inside any put option columns then put options from the current series with the selected strike will be selected. Otherwise call option will be selected.
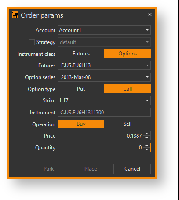
Fig. 4 – order params
You may also right-click on option desk row to open the context menu and use menu command Buy or Sell (Fig. 5).

Fig. 5 – the context menu
Order book
Order book is a handy way of representing active orders, including orders you have placed. There are two kinds of order books available from option desk - futures order book and option order book. Order book is a table with 3 columns:
- Price – price of orders;
- Size – size of orders (including orders you have placed);
- Own – size of orders you have placed.
Option order book
You can open an order book for any option on the option desk. Right-click on the desired option and select the Show order book command from the pop up menu. An order book window will be shown immediately (Fig. 6).
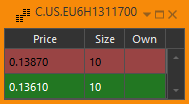
Fig. 6 – an order book
Futures order book
You can also open an order book for an option series' base futures (Fig. 7). Click  to open futures order book.
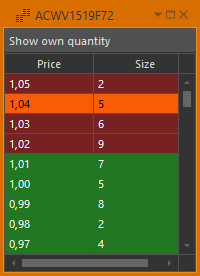
Fig. 7 – futures order book
| Note |
|---|
|

...
| Section | ||||||||||||||||||
|---|---|---|---|---|---|---|---|---|---|---|---|---|---|---|---|---|---|---|
|
Вызов Доски опционов
Для вызова таблицы необходимо:
выбрать базовый актив (рис. 2[1]);
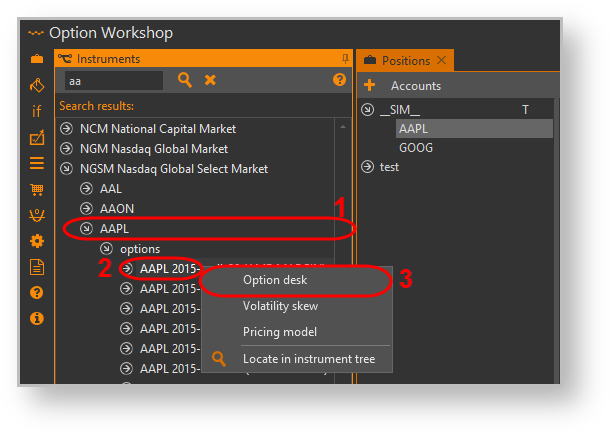
Рисунок 2 – вызов доски
- выбрать серию (рис. 2[2]);
- выбрать Option desk в контекстном меню (рис. 2[3]).
Одновременно могут быть открыты таблицы по разным сериям.
Описание Доски опционов
Доска опционов содержит колонки:
- Strike – страйк опциона;
- Position – текущая позиция пользователя. Для вывода значений необходимо выбрать стратегию в поле Show position from;
- Last price – цена последней сделки;
- Vola – биржевая волатильность;
- Theo – теоретическая цена опциона;
- Bid – лучшее предложение;
Ask – лучший спрос;
Info Ячейки Bid и Ask подсвечиваются, если цена bid выше теоретической цены, а ask – ниже.
- Bid IV – ожидаемая волатильность заявки bid;
- Ask IV – ожидаемая волатильность заявки ask;
- Theta, Vega, Gamma, Delta – производные теоретической цены опциона (греки);
- Intrinsic value – внутренняя стоимость опциона;
- Time value – временная стоимость опциона;
- Open interest – открытый интерес. Параметр доступен только для терминала QUIK.
Опционы CALL  и PUT
и PUT  объединены в строки по значению колонки Strike. Страйк, наиболее близкий к текущей цене базового актива, выделен цветом. Все колонки, кроме колонки Strike, отображаются отдельно для опционов Call и Put.
Над таблицей расположена панель управления, которая включает:

Рисунок 3 – верхняя панель инструментов
- текущую цену базового актива;
- текущая серия опционов. Серию можно выбрать другую из выпадающего списка;
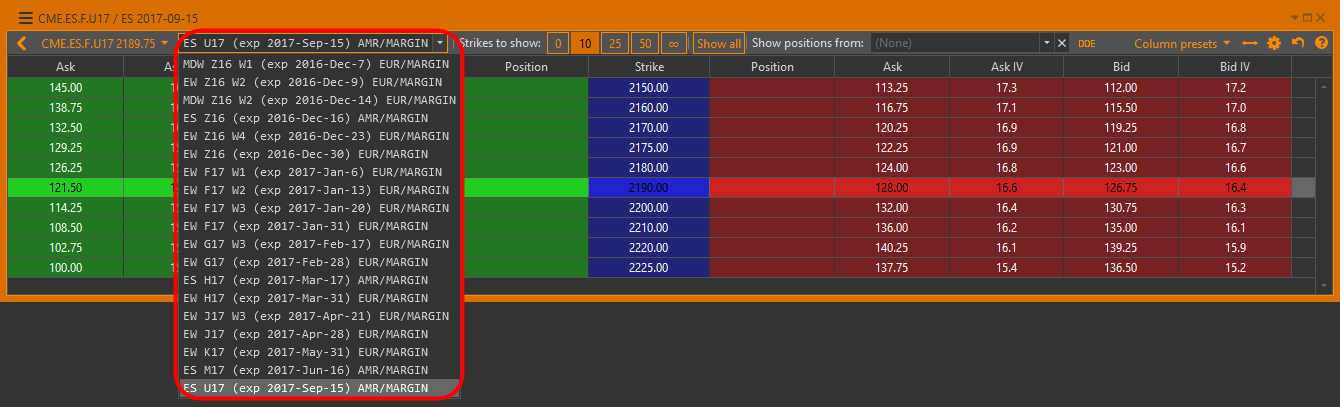
Рисунок 4 – серия опционов - кнопки выбора количества страйков, вокруг страйка на деньгах: 10, 25, 50 или все страйки. По умолчанию отображается 10 страйков;
- кнопка выбора страйков, отображаемых независимо от текущей цены базового актива. Для этого необходимо:
- нажать кнопку Show all;
- выбрать интересующие страйки, установив переключатель;
- снять переключатель Show all.
выпадающий список выбора стратегии. При нажатии на кнопку открывается список, в котором нужно выбрать стратегию. Если стратегия содержит позиции по инструменту, они появятся в колонке Position;
выпадающий список предустановленных наборов столбцов. Как создать такой набор описано в разделе Настройка таблицы
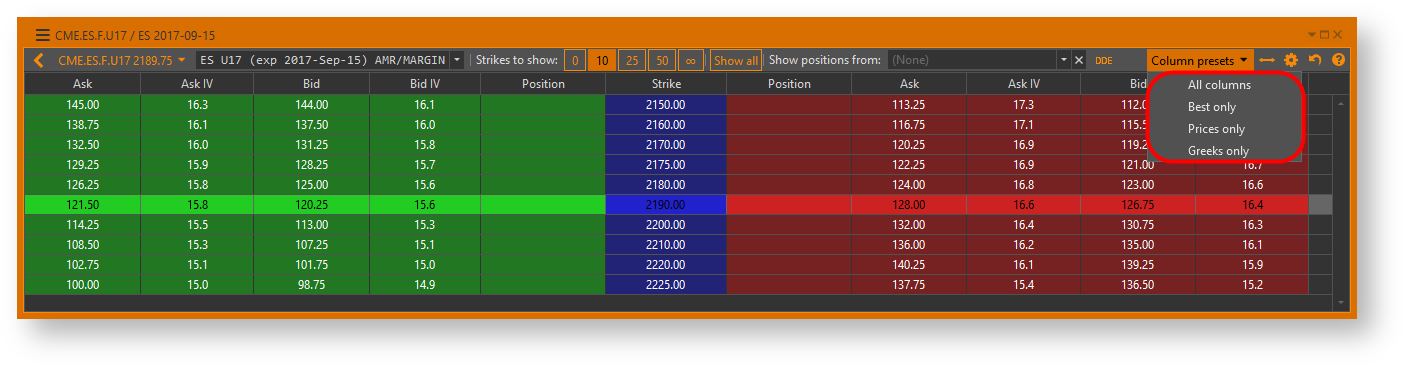
Рисунок 5 – выбор столбцов для отображения
Доступные действия
Пользователю доступны следующие операции (рис. 5) над опционами в таблице:
- Команды для опциона call/put:
- Order Book – переход к Книге заявок (подробнее в разделе Книга заявок);
- Buy/Sell – создание заявок на покупку/продажу (подробнее в разделе Работа с заявками);
- Historical chart – просмотр графика цен по инструменту (подробнее в разделе История цен по инструменту);
- Add to instrument board – добавление инструмента в Таблицу инструментов (подробнее в разделе Таблица инструментов);
- Подменю со списком команд для работы с сериями опционов:
- открыть доску опциона (Option desk);
- построить график волатильности (Volatility skew);
- настроить модель ценообразования (Pricing model);
- открыть доску спредов (Spread desk).
- Locate in instrument tree – поиск инструмента в общем списке инструментов (подробнее в разделе Список инструментов);
- Spread templates – добавить позиции в стратегии на основе шаблона (подробнее в разделе Шаблоны стратегий).
Для выбора действия следует нажать правой кнопкой мыши на инструмент, выбрать тип опциона, затем в контекстном меню выбрать необходимую операцию.
Рисунок 6 – операции, доступные пользователю
Из доски опционов можно добавить позицию, перетащив инструмент в таблицу позиций.
| Anchor | ||||
|---|---|---|---|---|
|
Для настройки таблицы используются кнопки на верхней панели Доски опционов:
 – равномерное выравнивание ширины столбцов по размеру окна;
 – сброс настроек таблицы;
 – выбор отображаемых колонок. При нажатии на кнопку откроется форма, в которой можно установить/снять флажок напротив названия столбцов (рис. 5). Для изменения порядка колонок следует нажать на название колонки и перетащить ее, либо использовать кнопки
  и
и  . Для возврата к порядку столбцов по умолчанию, следует нажать кнопку Reset to default.
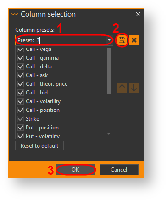
Рисунок 7 – выбор колонок
Набор выбранных колонок можно сохранить. Для этого следует в поле Column presets ввести название набора, нажать кнопку Сохранить (рис. 6 [2]) и кнопку OK (6 [3]). Доступные наборы будут отображаться в раскрывающемся списке (рис. 7).
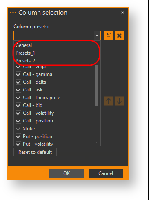
Рисунок 8 – список сохраненных наборов
Overview
Content Tools